AFFECTS
Konect Manager
ISSUE
You want to import existing data in CSV format for use in Konect. You may want to either create a new dataset or append records to an existing dataset.
Existing datasets may be available as CSV files as CSV is a particularly common data exchange format. CSV files can be brought into Konect and mapped as point features.
CSV files can be interpreted by Konect Manager as point feature GIS files if they have two columns that contain the longitude and latitude of point objects in the WGS 84 coordinate system.
STEP-BY-STEP
Imported data can be used to create a new dataset or be appended to an existing dataset.
If the two coordinate columns have the names ‘X’ and ‘Y’, then importing a CSV file is the same as importing a TAB or SHP file.
If the coordinate columns are not called ‘X’ and ‘Y’, then Konect Manager asks the user to select which columns contain the longitude and latitude.
As an example, import the file ‘Bins.CSV’ (available for download at Bins.zip) which stores the longitude and latitude in the columns ‘Long’ and ‘Lat’.
- Press the ‘Browse’ button and select the file ‘Bins.CSV’.
- The ‘Select geometry fields’ control appears.
- Select ‘Long’ for the longitude field and ‘Lat’ for the latitude field.
- Press the ‘Ok’ button
- Select ‘Create a new dataset’.
- Press the ‘Create new’ button.
- Press the ‘Yes’ button.
- Give the dataset the name ‘Bins’ and press ‘Ok’.
Go to the ‘Data’ tab and select the ‘Bins’ dataset to view the 6 bins that are along the streets George and Mary in the city of Brisbane, Australia.
The grid at the bottom of the ‘Data’ tab gives the aspatial bin information.
Note: the order of the records is not the same as in the file ‘Bins.CSV’.
Creating A New Dataset
Use the following steps to create a new dataset by importing a CSV file:
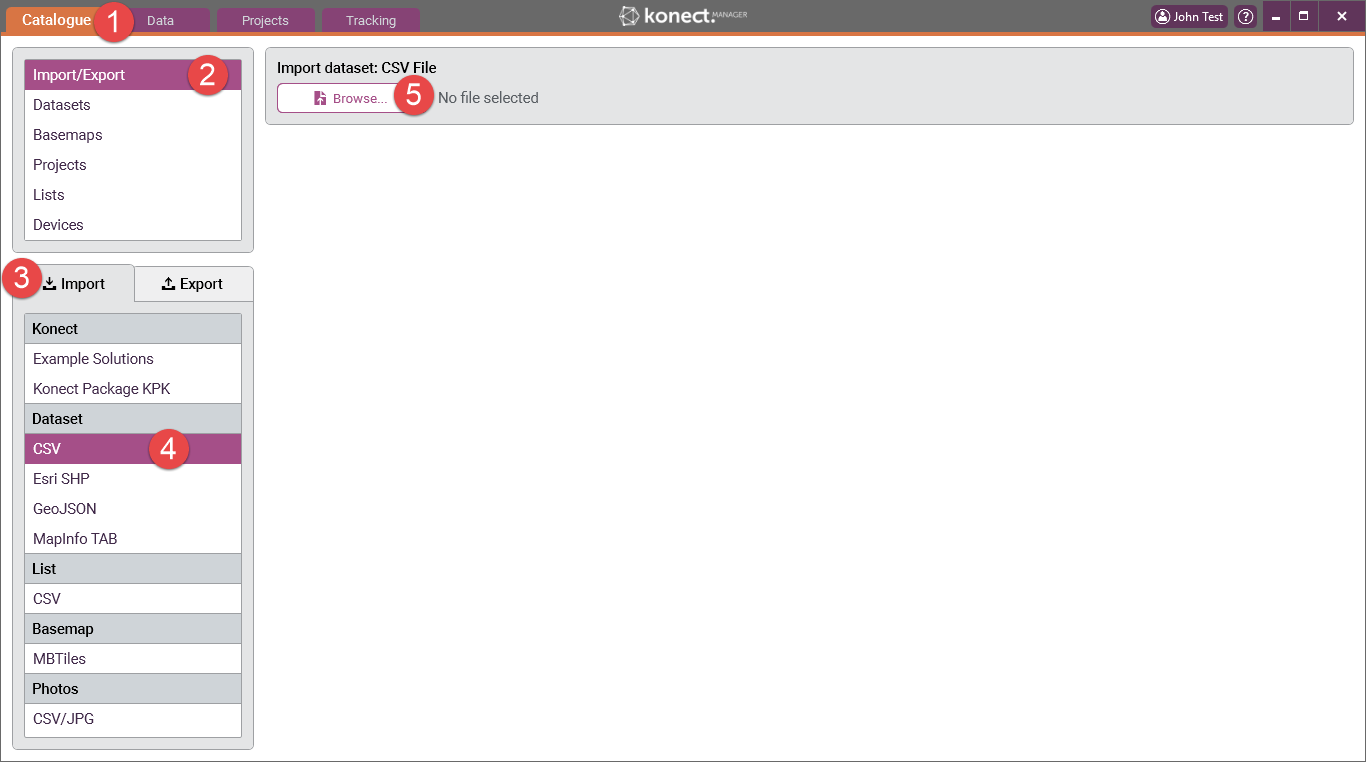
1 Go to the ‘Catalogue’ tab in Konect Manager.
2 Select the ‘Import/Export’
3 Select the ‘Import’ tab.
4 Select ‘CSV' in the ‘Dataset’ list.
5 Press the ‘Browse’ button. Select and 'Open' the required file. In this example ‘Bins.csv' has been used.
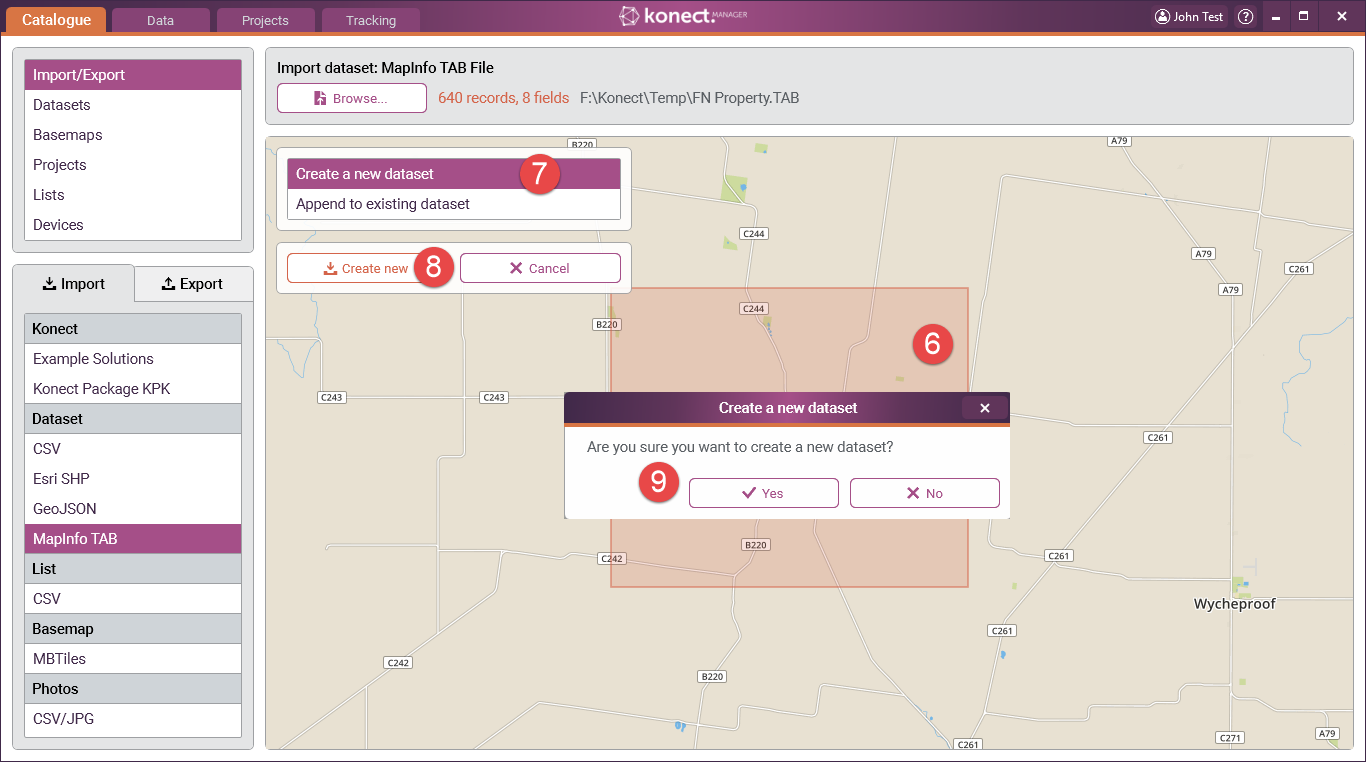
6 Konect Manager reads the contents of the selected file and displays the number of records and the number of data fields in the file. It also draws a rectangle, called the bounding rectangle, that geographically encompasses all the map features in the file. The user can use this information to check that the correct data is being imported.
Konect performs a comparison between the dataset being imported and all existing datasets in Konect. If the data structure matches in any way you will be presented with the option of either 'Creating a new dataset' or 'Appending to an existing dataset'.
If there is no match then you are only given the option of 'Creating a new dataset'
7 If required, select 'Create a new dataset' from the options box
8 Select 'Create new'
9 Click 'Yes' when prompted to create the dataset
10 Enter the name that you want to give to the dataset. In this example "Property".
11 Press the 'Ok' button.
12 The TAB file is imported and Konect Manager automatically goes to the ‘Datasets’ item in the ‘Catalogue’ from where various data settings can be set, added or modified.
Importing a TAB file - Append To An Existing Dataset
Records can be appended (added) to an existing dataset by importing a TAB file.
1 Go to the ‘Catalogue’ tab in Konect Manager.
2 Select the ‘Import/Export’
3 Select the ‘Import’ tab.
4 Select ‘MapInfo TAB’ in the ‘Dataset’ list.
5 Press the ‘Browse’ button. Select and 'Open' the required file. In this example we have used ‘FN Property.TAB’
6 Konect Manager reads the contents of the selected file and displays the number of records and the number of data fields in the file. It also draws a rectangle, called the bounding rectangle, that geographically encompasses all the map features in the file. The user can use this information to check that the correct data is being imported.
7 Select 'Append to existing dataset' from the options box. This option box will only present if there is a full or partial match between the file being imported and any Konect datasets.
8 This will cause the "Choose dataset to append' box to open
9 Open the 'Please select' list and select the dataset you want to append to.
The list shows all the existing Konect datasets that have at least one matching field with the GIS file. It also shows the number of fields that match. For a field to match it must have:
- The same name as a field in the existing Konect dataset.
- A type that can be converted to the type of field in the existing Konect dataset. For example, if there is a Text field called ID in the existing dataset and a Number field called ID in the import file, then these two fields are a match because a number can always be converted to its textual representation. However, if the field ID in the existing dataset is a Number field and the field ID in the import file is a Text field then these two fields are not a match because text cannot always be converted to a number.
If the mouse is hovered over an item in the dropdown list, the matching fields are displayed.
After choosing a dataset to append to, Konect Manager shows which fields are not matched, if there are any.
10 Select 'Append dataset'
11 Click 'Yes' when prompted to create the dataset
12 The records are appended and Konect Manager automatically goes to the ‘Datasets’ item in the ‘Catalogue’.
.


