Konect Automatic GPS tracking Drawing allows users to create or update line or area features with a recorded GPS track. A GPS track path. The path is a recording of GPS positions. New positions are automatically included in the GPS track path when the GPS has moved a configured distance from the previously recorded position. GPS positions can also be included manually into the GPS trackpath.
The Automatic GPS track Drawing path is used with the drawing tools in either the add new feature or update existing feature drawing modes. Users can save the GPS track path as is to a new feature or use the drawing tools to add additional points anywhere within the GPS track path to new or existing feature.
Automatic GPS
...
Drawing Settings
The Automatic GPS tracking Drawing settings can be found on the bottom map drawer next to the project picker. The GPS can now be enabled from these settings.
...
...
Users can change:
If the Automatic GPS Drawing tools are enabled on the main map
The colour the Automatic GPS track Drawing path is displayed on the map (no display, blue, green, magenta, yellow, or cyan). The default is blue.
The distance filter which configures the distance the GPS position must be from the previous position to automatically be included in the GPS trackpath. The default is 20 metres.
Please note initially the second position in the GPS track path will be updated closer than the configured distance filter until the second position is further away.
Whether to automatically clear the Automatic GPS track Drawing path after it has been used in a saved feature. The default is to clear the GPS trackpath.
Location Tolerance and Battery Concerns
While the Automatic GPS tracking Drawing is actively recording positions the konect app and the GPS will continue to run even in the background. This will consume additional battery. The lower the location tolerance settings the higher the battery consumption will be.
Some devices may flag the konect app as a high battery consuming app when using the GPS and may kill the app in the background under some circumstances. More information can be found here: https://dontkillmyapp.com/
Feature Quality and Performance Concerns
Having a low value for the distance filter can make the Automatic GPS track Drawing untidy and jump around (particularly while stationary) depending on the quality of the GPS fix.
Having a low value for the distance filter can also make any created features very large and complex. The Automatic GPS tracking Drawing feature has a cap of 10,000 positions. If this cap is reached, create a feature with the GPS track path and start another. Large features can slow down konect and other GIS applications that may use them. A post processing procedure to thin nodes may be required for features with points over more then a few thousand points to allow konect to work optimally.
How to Use Automatic GPS
...
Drawing
Ensure the GPS is enabled
Ensure the Show UI on main map is enabled from the Automatic GPS Drawing settings
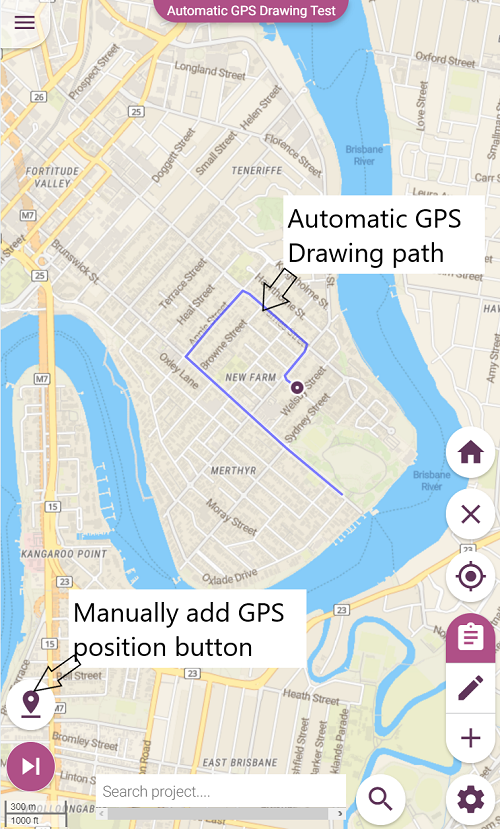
Open a konect project to the map and press the Automatic GPS tracking Drawing popup menu button from the left-hand toolbar. This button will always be available (if enabled) regardless of mode and when it is highlighted there is an active trackpath.

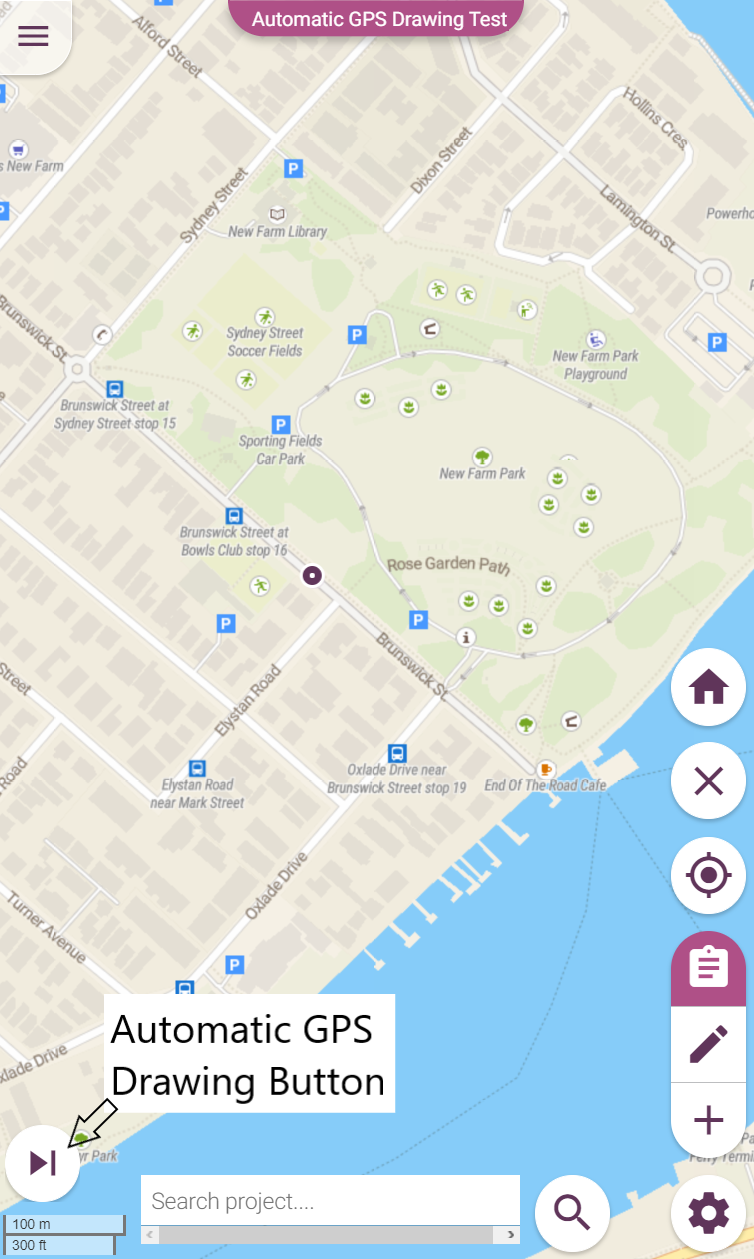
Press the start button from the Automatic GPS tracking Drawing popup menu. This will start the Automatic GPS trackDrawing collecting locations.


Pressing the pause button will keep the GPS trackpath, but prevent new positions from automatically being included. Press the start button again to resume automatically recording new positions
Pressing the clear button will clear the Automatic GPS track Drawing path from the device
The Automatic GPS track Drawing path will be displayed on the map in the colour specified in the Automatic GPS tracking Drawing settings.
Walk/ride/drive the track path you wish to record; new positions will automatically be included in the GPS track path when the GPS is further away from the previously recorded position then the configured distance filter.
Additional GPS positions can be included by pressing the manually add GPS position button. This will add the current GPS position to the GPS trackpath. This feature is useful to add finer detail to the Automatic GPS track Drawing path then can be captured by the automatic recording.

This button becomes active when a the Automatic GPS track Drawing path is started, can be used when the GPS track path is paused and is available in all modes.
How to Create a New Feature with the Automatic GPS
...
Drawing
Open a konect project and enter the add new feature mode
Choose a dataset to draw that is a line or area
Use an existing Automatic GPS track Drawing path or create a new Automatic GPS track Drawing path to use for the feature
Pausing the Automatic GPS track Drawing path while drawing will ensure no additional GPS positions are included (this can occur when there is poor GPS quality)
Press the add Automatic GPS track Drawing path to feature button. This will append all the positions from the GPS track path into the new feature. This button is only available when a track path is active and a line or area dataset has been chosen.


If any points were already drawn the copied GPS track path will be appended to these points.
The drawing tools will continue to work as normal allowing you to append points to the end of the feature or to edit any points within the feature including the appended GPS trackpath
The undo button will roll back the add Automatic GPS track Drawing path to feature action removing the entire GPS trackpath
Press the save button and fill in the form
If the automatically clear Automatic GPS track Drawing path setting is enabled and the GPS track path was used in the feature the Automatic GPS track Drawing path will be cleared.
How to Update an Existing Feature with the Automatic GPS
...
Drawing
Open a konect project and enter the update existing feature mode
Select a line or area feature to update
Use an existing Automatic GPS track Drawing path or create a new Automatic GPS track Drawing path to use for the feature
Pausing the Automatic GPS track Drawing while drawing will ensure no additional GPS positions are included (this can occur when there is poor GPS quality)
Press the add Automatic GPS track Drawing path to feature button. This will append all the positions from the GPS track path to the end of the feature. This button is only available when a track path is active and a line or area feature has been selected.


The drawing tools will continue to work as normal allowing you to append points to the end of the feature or to edit any points within the feature including the appended GPS trackpath
The undo button will roll back the add Automatic GPS track Drawing path to feature action removing the entire GPS trackpath
Press the save button
If the automatically clear Automatic GPS track Drawing path setting is enabled and the GPS track path was used in the feature the GPS track path will be cleared.
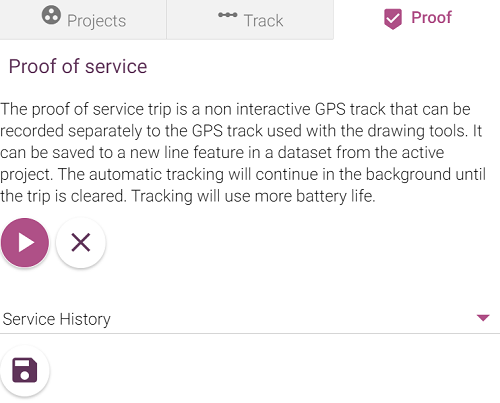
Proof of Service
Konect proof of service is a second Automatic GPS track Drawing path used for proof of service style use cases. The proof of service GPS track path is run in the background with minimal user interaction, so as not to interfere with the primary Automatic GPS trackingDrawing. If this cut down version of Automatic GPS tracking Drawing is not suited to your proof of service use cases, you can still use the primary Automatic GPS tracking Drawing function instead.
The proof of service Automatic GPS trackDrawing path:
Can be recorded at the same time as the primary Automatic GPS tracking Drawing function
Will use the distance filter defined in Automatic GPS trackingDrawing
Suffers from the same battery and quality issues as the primary Automatic GPS trackingDrawing
Including a 10,000 position limit
Will not be displayed on the map
Cannot be paused
Can only be used to create new line features
Can record 2 additional autovalue fields configured through konect manager

Start date and time of the first recorded GPS position
End date and time of the final recorded GPS position
How to Create a Proof of Service Feature
Ensure the GPS is enabled
Open a konect project to the map
Open the proof of service UI found on the bottom map drawer next the project picker and Automatic GPS tracking Drawing settings
Press the start proof of service button
Pressing the clear proof of service button will clear the proof of service GPS track path from the device
Continue to perform your regular shift work
At the end of the shift open the proof of service UI again
Select the dataset to save the proof of service GPS track path to
The dataset list will only contain datasets that can create new lines
Press the save button, the dataset form will immediately open storing the proof of service GPS track path as the feature’s geometry
Fill in the form and form save button
The proof of service track path will be cleared on closing the form
...